目次
Web3authとは?
一言でいうと..
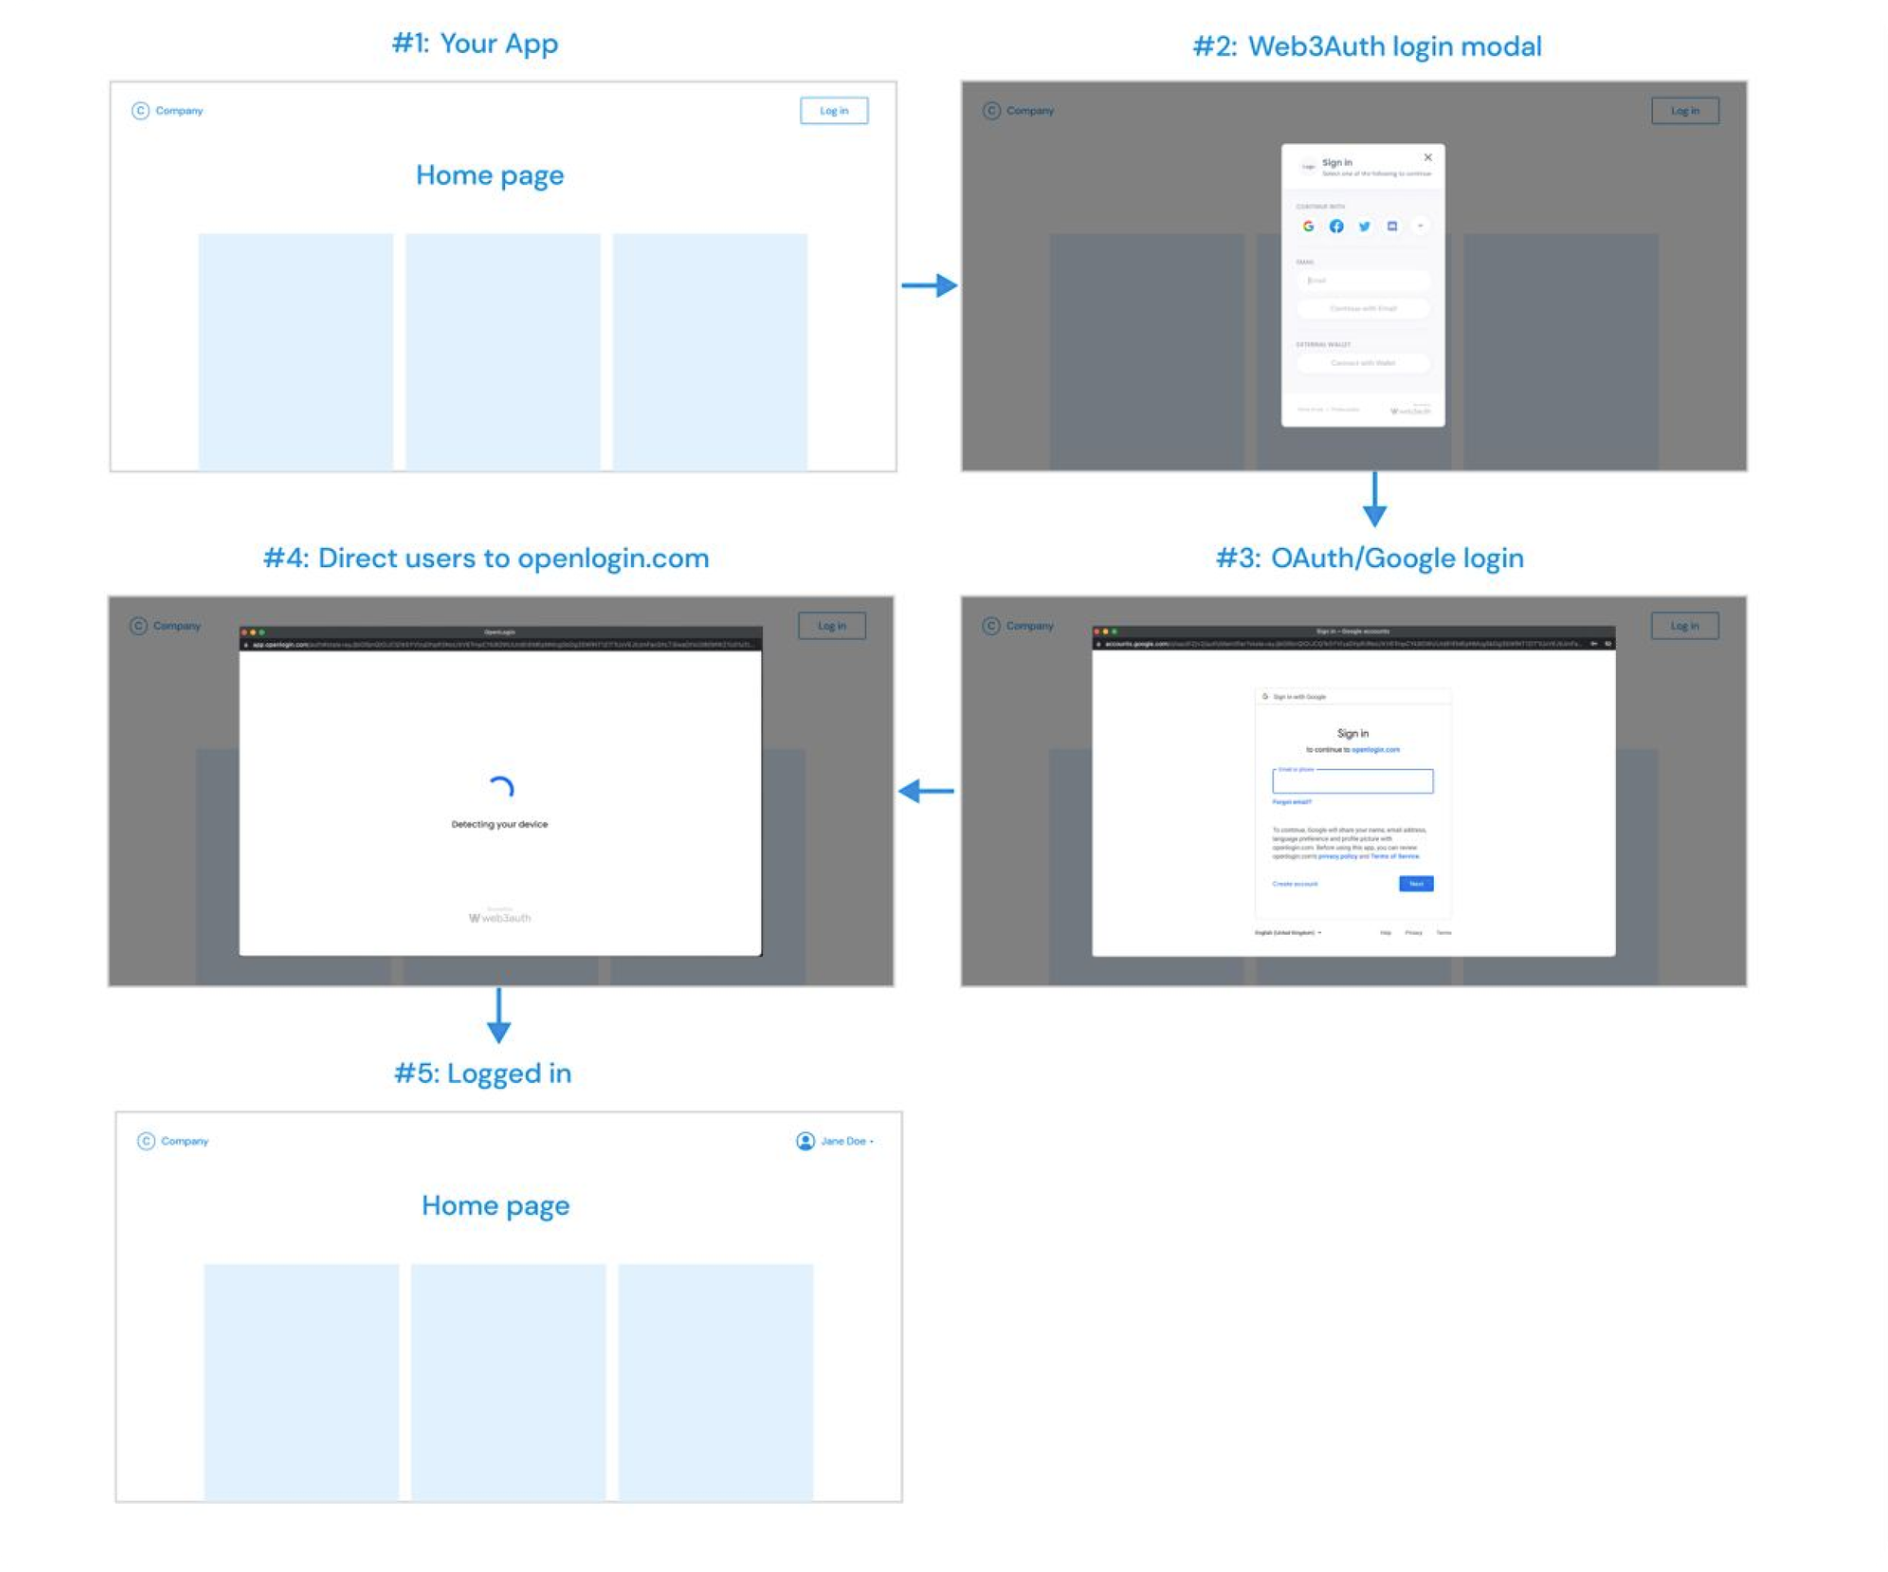
Metamaskが不要になる!
ユーザーは、Metamaskのかわりにweb2.0のようにgoogleやemailを用いてログインすることも可能に。DappsのUI/UXの観点で大きな効果がある。
概要
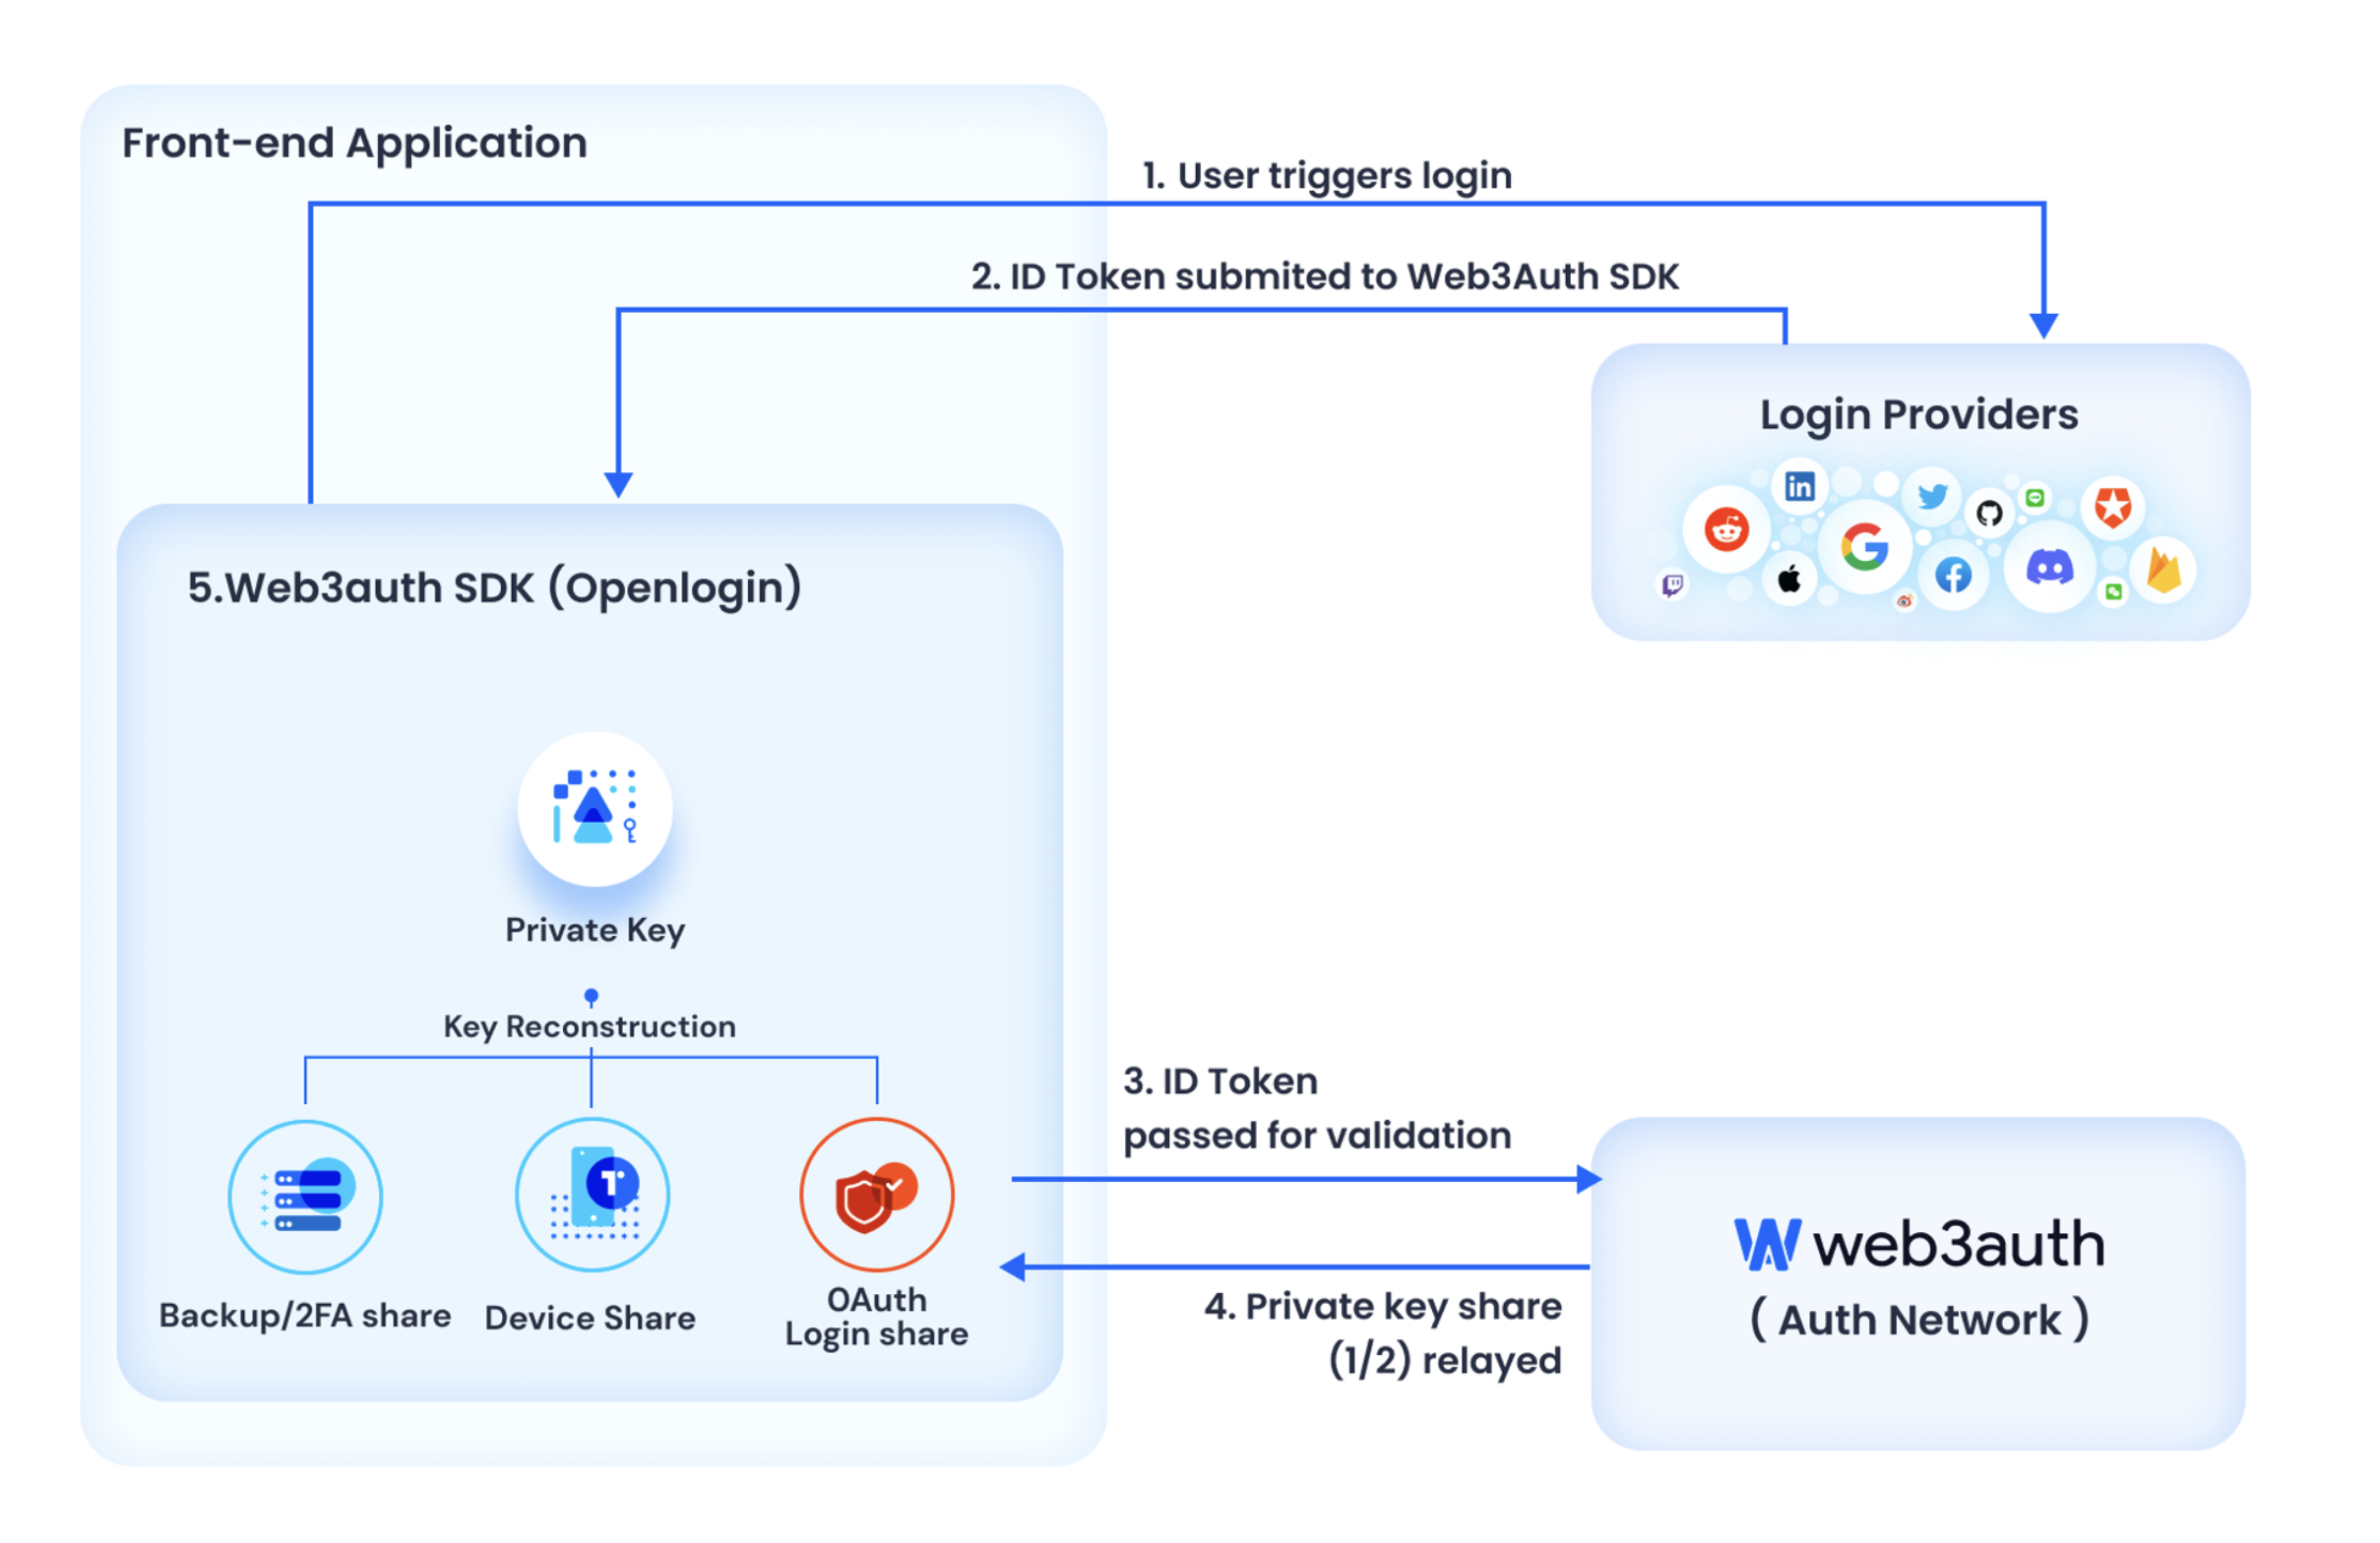
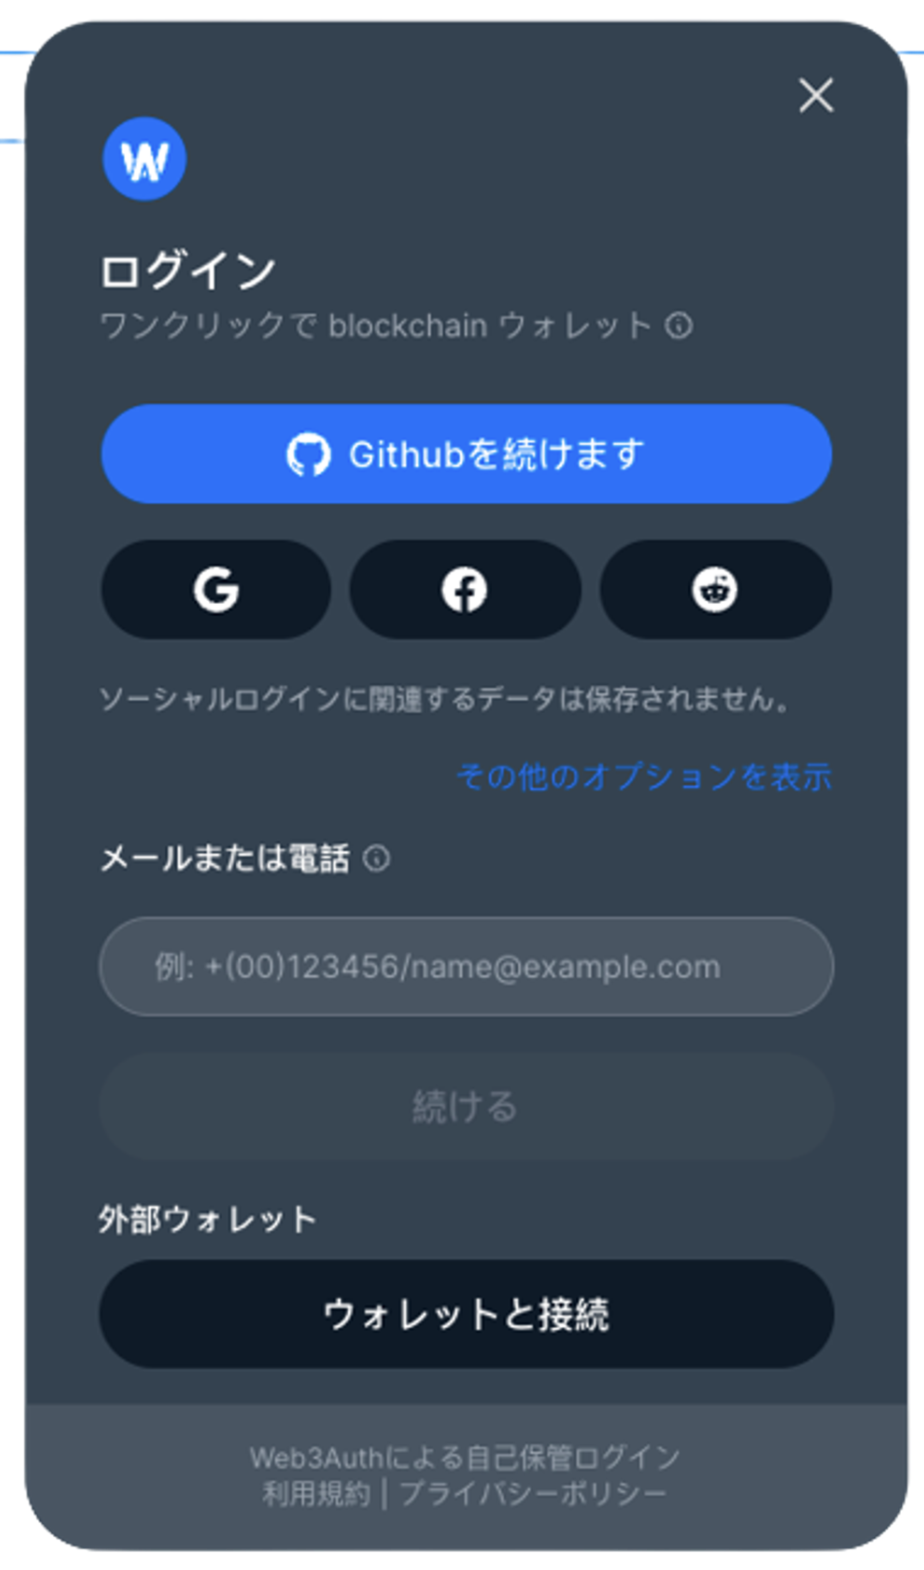
Web3Authは、Web3ウォレットおよびアプリケーション用の認証ツール。すべてのソーシャルログイン、Webおよびモバイルネイティブプラットフォーム、ウォレットなどたくさんのキー管理方法に対応している。
ソーシャルログイン: GoogleやFacebookなど通常のログイン手法を使うことができる。また、メールを用いて場合はメールにリンクが送られてくる認証形式。
非保管公開鍵インフラ:ユーザーは、暗号鍵ペアの所有権とアクセスを制御。プロバイダーが独自にユーザーの秘密キーを取得することは不可能。
UIカスタマイズ: Web3AuthのデフォルトのUIをシンプルな方法でカスタマイズ可能。また、Webとモバイルどちらも対応
(参考: https://web3auth.io/docs/how-web3auth-works)
Web SDK
1. パッケージをインストール
npm install --save @web3auth/modal

or

yarn add @web3auth/modal
※ node 18以上が必要
2. web3auth ダッシュボードでプロジェクトを作成
1. Googleアカウントなどでアカウントを作成&ログイン
2. Create Projectを選択

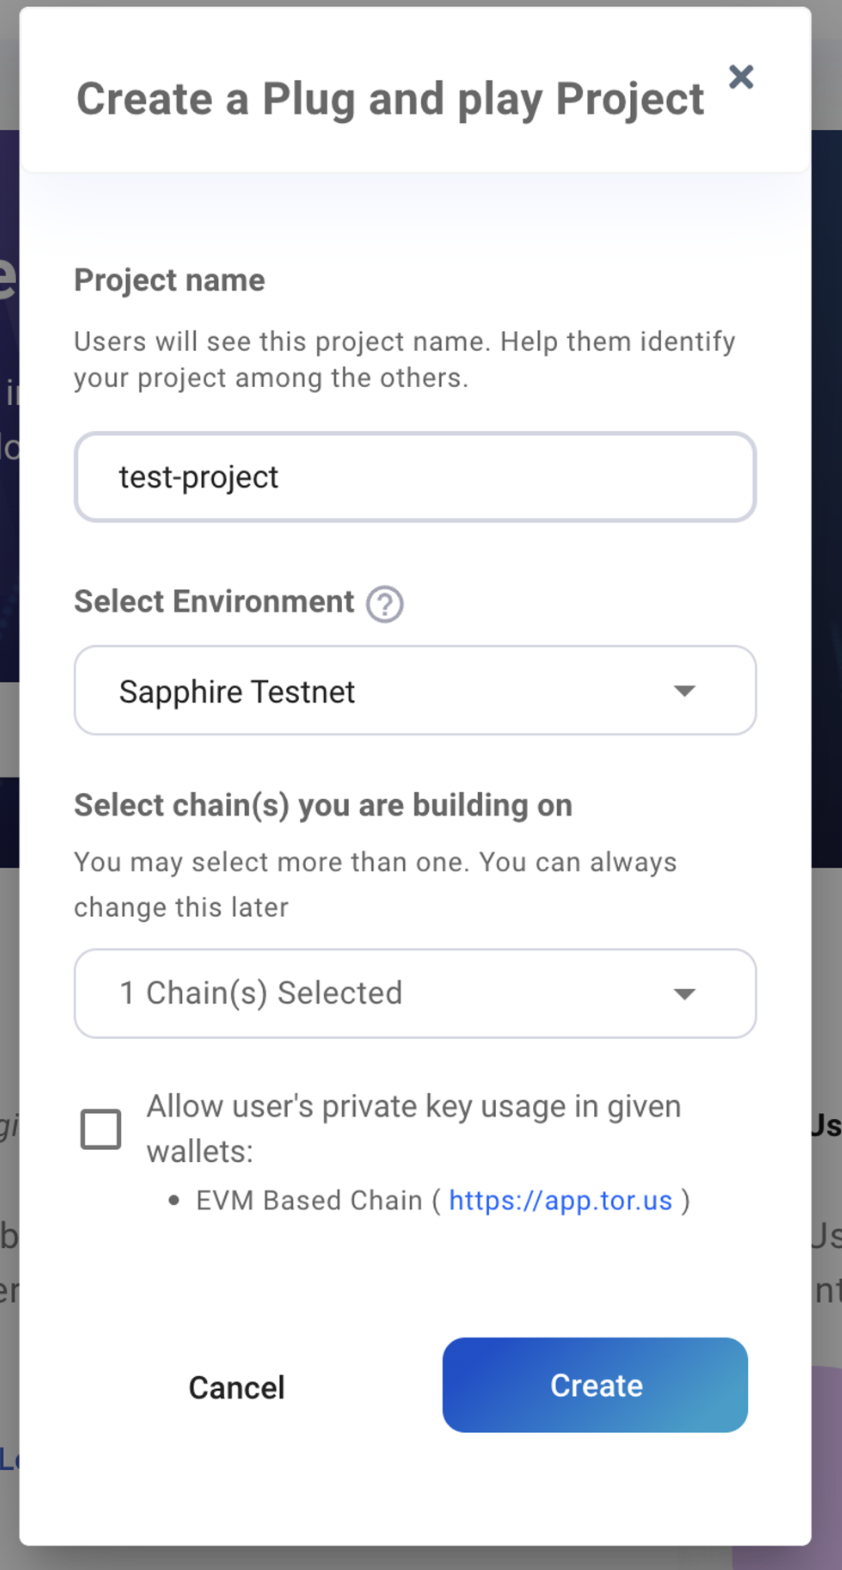
3. プロジェクトの作成画面
選択するのは3つ
- project name
- 名前 英語で5文字以上
- select environment
- テストネットの場合は、sapphire testnetを選択
- select chain
- イーサリアムベースの場合は、EVM based Chainを選択
(作成したあとのプロジェクトダッシュボード画面)
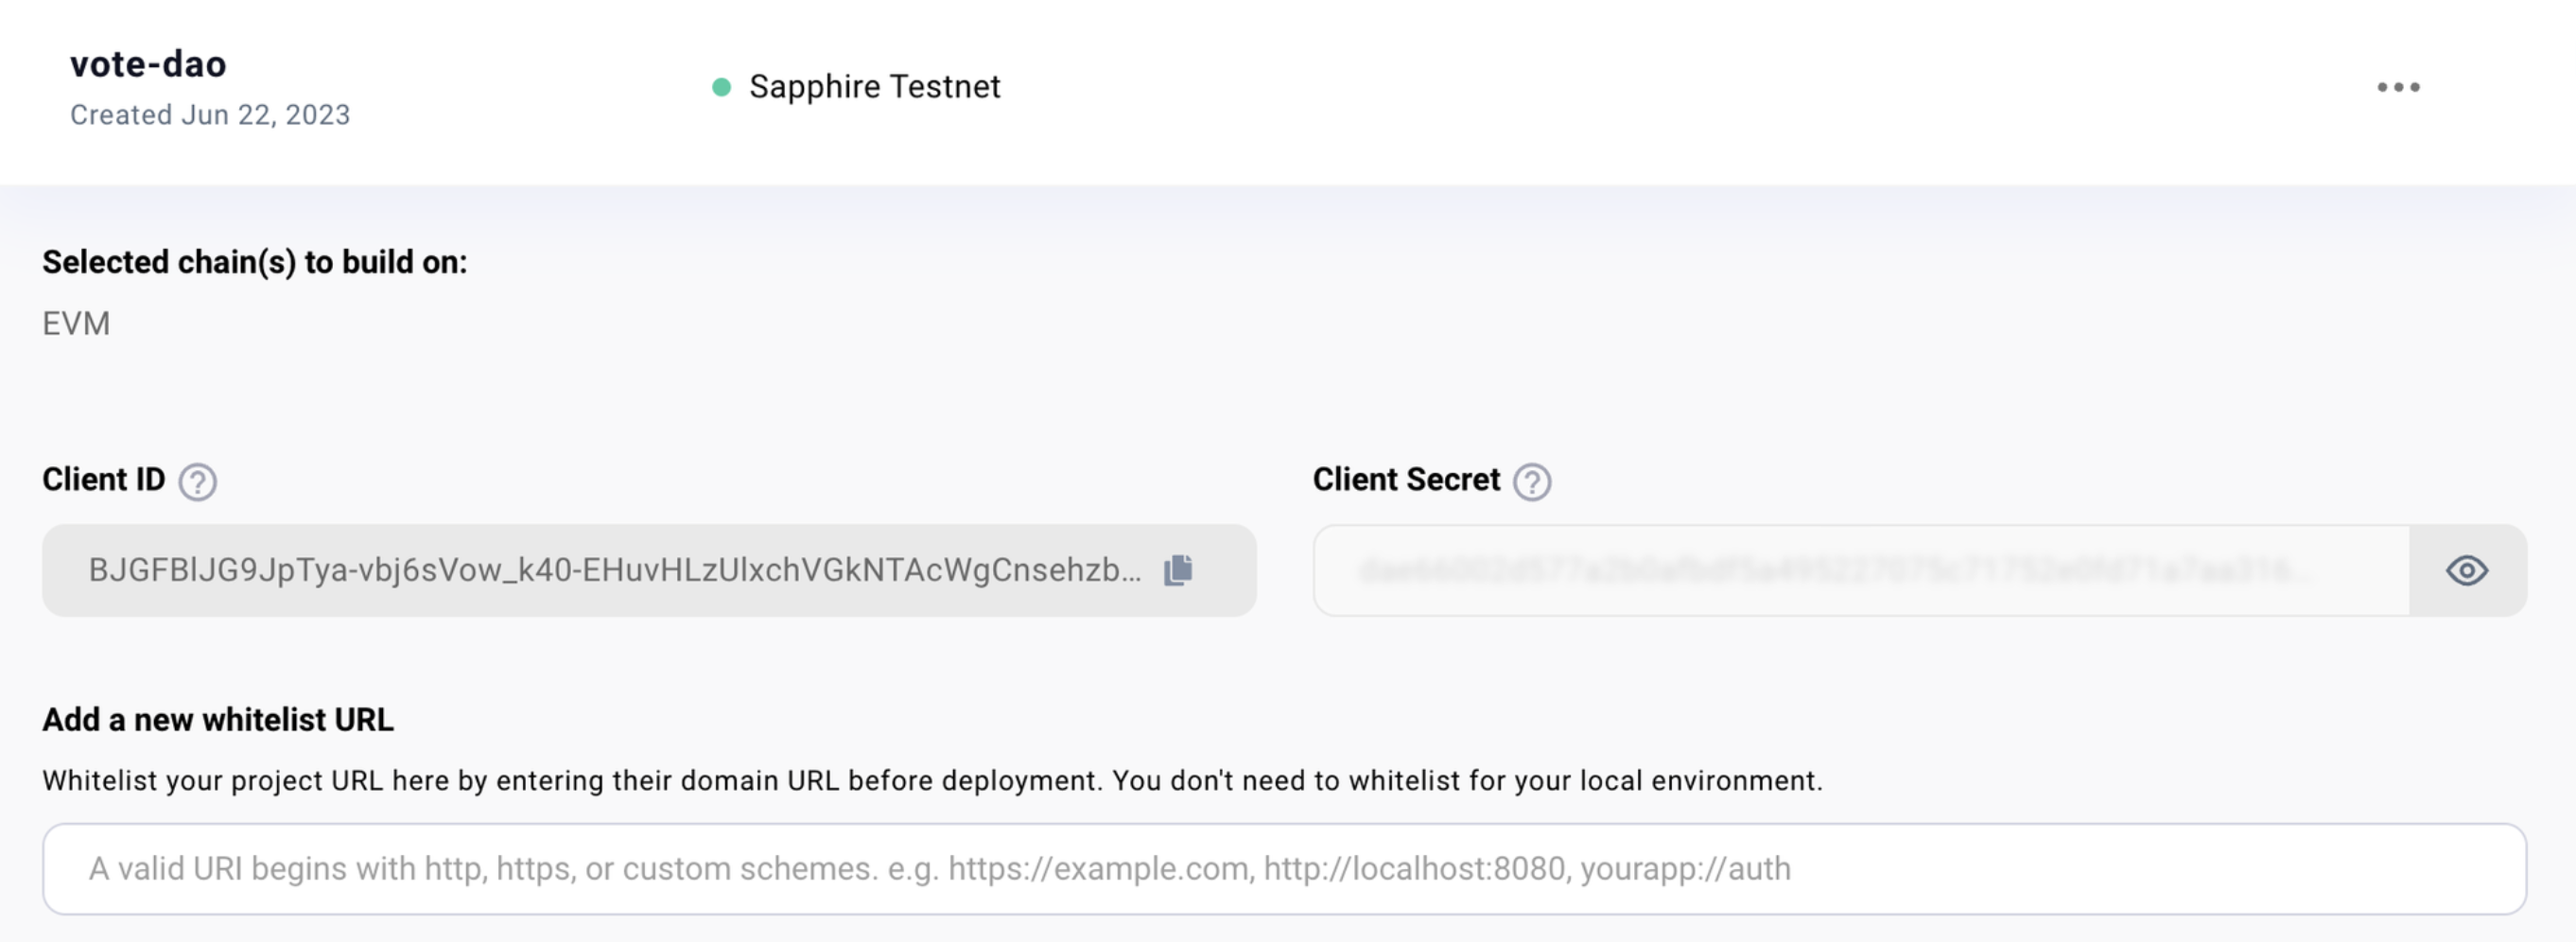
※Client IDをコード上で使用
Web3authの使い方(基礎)
Import
index.tsxなどでimport
import { Web3Auth } from "@web3auth/modal";
web3authのインスタンス化
// web3authをインスタンス化
const web3auth = new Web3Auth({
	clientId: "先程コピーしたId", // Get your Client ID from Web3Auth Dashboard
	chainConfig: {
		chainNamespace: "eip155",
		chainId: "0x5", // Please use 0x5 for Goerli Testnet
	},
});
- clientIdは、先程作成したダッシュボード上でコピーアンドペースト
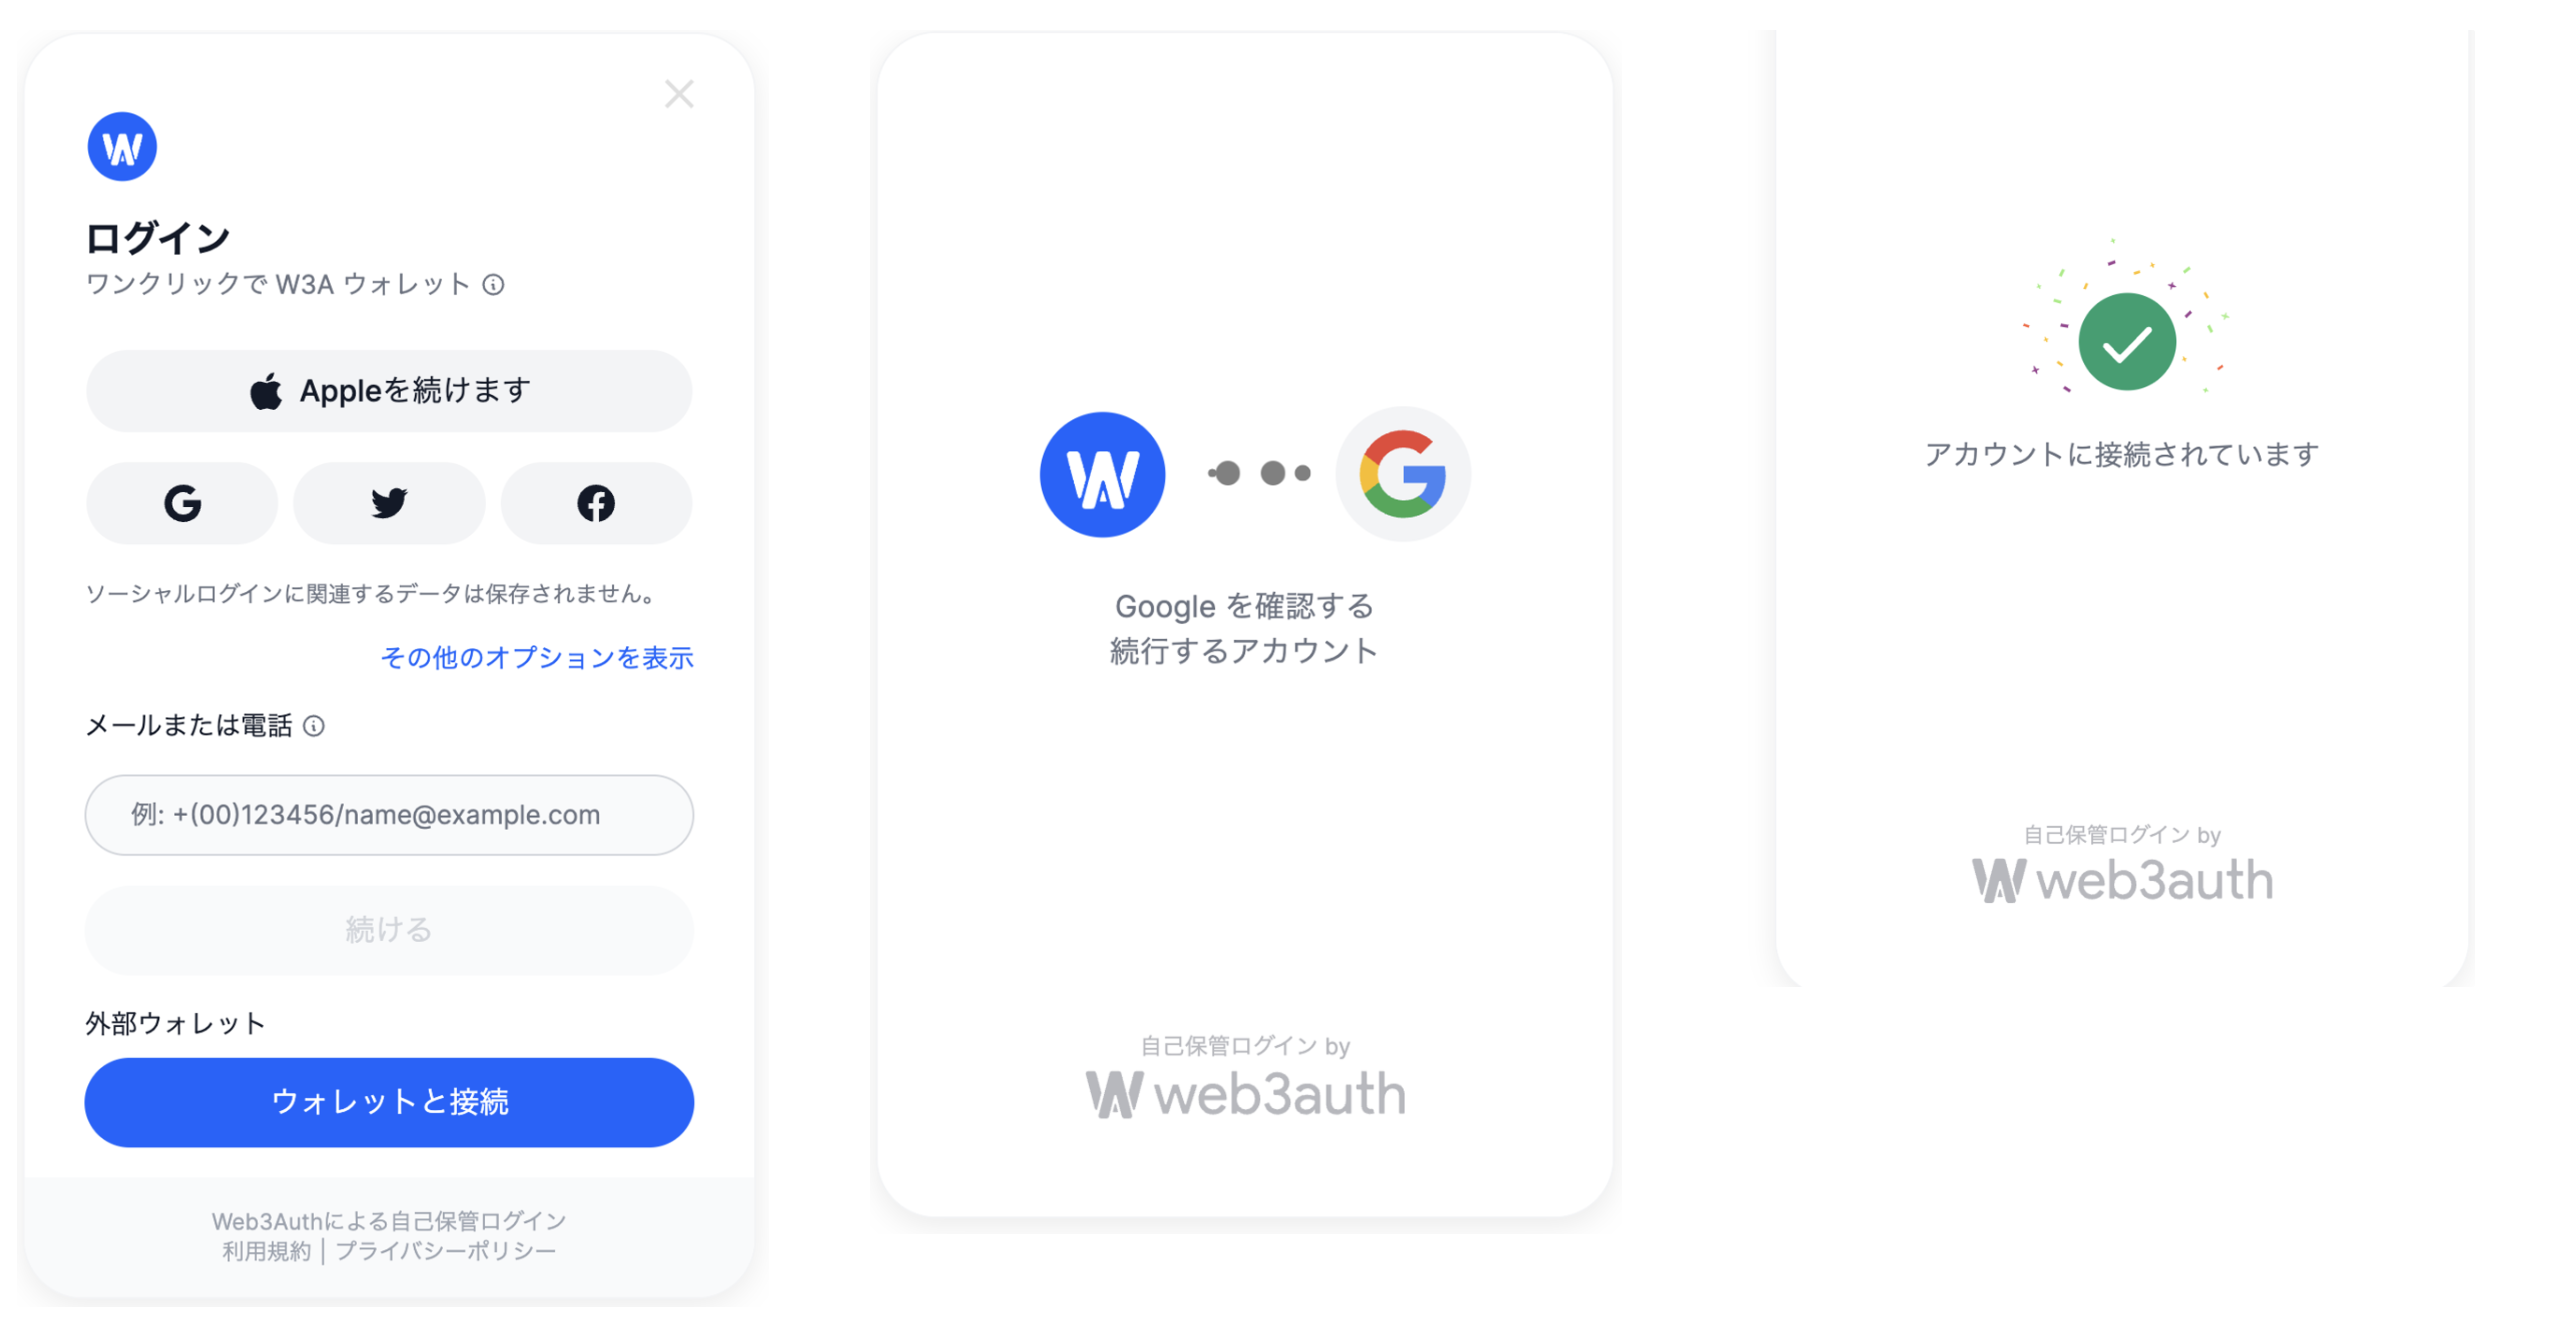
UIのconfigを更に設定
const web3auth = new Web3Auth({
  // type uiConfig
  uiConfig: {
    appName: "W3A", // <-- Your dApp Name
    appLogo: "<https://web3auth.io/images/w3a-L-Favicon-1.svg>", // Your dApp Logo URL
    theme: "light", // "light" | "dark" | "auto"
    loginMethodsOrder: ["apple", "google", "twitter"],
    defaultLanguage: "en", // en, de, ja, ko, zh, es, fr, pt, nl
    loginGridCol: 3, // 2 | 3
    primaryButton: "externalLogin", // "externalLogin" | "socialLogin" | "emailLogin"
  },
  chainConfig: { chainNamespace: CHAIN_NAMESPACES.EIP155 },
  clientId: "YOUR_WEB3AUTH_CLIENT_ID",
  web3AuthNetwork: "cyan",
});
default languageをjaにすると、日本語になる
非同期処理でインスタンスを初期化
useEffectとasync awaitを使用
const checkIfWalletIsConnected = async () => {
	try {
		if (!web3auth) {
			console.log("web3auth not initialized yet");
			return;
		}

		await web3auth.initModal();
	} catch (error) {
		console.log(error);
	}
};

React.useEffect(() => {
	checkIfWalletIsConnected();
}, []);
initModalのカスタマイズ
ログイン時に表示する方法を選択する
// facebookとredditをログイン方法から除外する
await web3auth.initModal({
  modalConfig: {
    [WALLET_ADAPTERS.OPENLOGIN]: {
      label: "openlogin",
      loginMethods: {
        // Disable facebook and reddit
        facebook: {
          name: "facebook",
          showOnModal: false,
        },
        reddit: {
          name: "reddit",
          showOnModal: false,
        },
      },
    },
  },
});
ログイン機能の実装
axync functionの内部で、下記のように記述するだけ。
const connectWallet = async () => {
	try {
		if (!web3auth) {
			console.log("web3auth not initialized yet");
			return;
		}

		const provider = await web3auth.connect();
		setCurrentAccount(provider);
	} catch (error) {
		console.log(error);
	}
};

return(
	<button onClick={connectWallet} className="cta-button connect-wallet-button">
		Connect to Wallet
	</button>
)
ユーザー情報を取得
const getUserInfo = async () => {
    if (!web3auth) {
      console.log("web3auth not initialized yet");
      return;
    }
    const user = await web3auth.getUserInfo();
    console.log(user);
  };
ログアウト
const logout = async () => {
    if (!web3auth) {
      console.log("web3auth not initialized yet");
      return;
    }
    await web3auth.logout();
    setProvider(null);
  };
Web3authの使い方(実践)
ethers.jsとの連携
providerにweb3auth.connect()のproviderを追加するだけ
import { Web3Auth } from "@web3auth/modal";
import { ethers } from "ethers";

const web3authProvider = web3auth.connect();

const provider = new ethers.providers.Web3Provider(web3authProvider); // web3auth.provider
後は従来のコントラクト操作と同じように扱う事ができる
const provider = new ethers.providers.Web3Provider(currentAccount);
const signer = provider.getSigner();
const voteContract = new ethers.Contract(contractAddress, contractABI, signer);

let IdeaTxn = await voteContract.addIdea(ideaName, file_cid, name_original);
await IdeaTxn.wait();
web3authを使うことで要らなくなった従来の処理
const checkIfWalletIsConnected = async () => {
	const { ethereum } = window as any;
	if (!ethereum) {
		console.log("Make sure you have MetaMask!");
		return;
	} else {
		console.log("We have the ethereum object", ethereum);
	}

	const accounts = await ethereum.request({ method: "eth_accounts" });

	if (accounts.length !== 0) {
		const account = accounts[0];
		console.log("Found an authorized account:", account);
		setCurrentAccount(account);
	} else {
		console.log("No authorized account found");
	}
}

const connectWallet = async () => {
	const { ethereum } = window as any;
	if (!ethereum) {
		alert("Get MetaMask!");
		return;
	}
	const accounts = await ethereum.request({
		method: "eth_requestAccounts",
	});
	console.log("Connected", accounts[0]);
	setCurrentAccount(accounts[0]);
};
web3.jsとの連携
ethers.jsと同じく、web3auth.connect()のproviderを追加するだけ

import { Web3Auth } from "@web3auth/modal";
import Web3 from "web3";

const web3authProvider = web3auth.connect();

const web3 = new Web3(web3authProvider); // web3auth.provider
おわりに
本ブログでは、web3authの概要とインストール、実際の使い方をご紹介した。ethers.jsやweb3.jsと簡単に連携できるため、是非一度ご利用していただきたい。